Saturday, August 28, 2010

Retrofit - Week 7

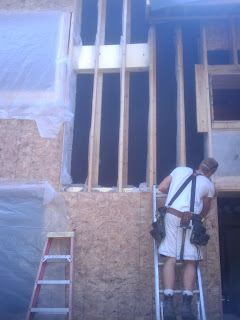
Yeeha, another week of rocking the retrofit! Shawn decided to postpone his honeymoon trip (I think he likes the abuse he and Sam give each other) which was a good thing because Peter was limping on an infected foot that landed him a quiet ("boring") weekend in the hospital. Our very capable crew kept going, though. Monday was all about finishing the framing out of the East wall and starting the South wall. Tuesday and Wednesday were finishing the South and working on the the West. Meanwhile, I was thoroughly cleaning out the attic space above the bathroom after finding some vermiculite insulation. Friday was all about playing with the dense-pack cellulose and sheeting the East wall. The insulation project seemed a bit less experimental after making the acquaintance of Gerard Gagnon, owner of Ace Insulation in Maine, who has done tons of dense packing in "fat walls" with no evidence of settling over time.

Saturday Amber and I met with Nagel-Built cabinets again and gave him the go ahead on some awesome cabinets. Then I did some wiring and plumbed a hose bib for the West wall so the framing can be completed.

On Monday I had to install two of the penetrations through the soon to be dense-packed wall: An air intake for the fireplace to be fitted with a mini-super-damper and an 18" hose bib wrapped in pipe insulation to avoid condensation.


This is what the south wall looked like on Monday afternoon.


Here is Jeff installing some settling sensors to test for settling. The theory is that the top sensors under a dividing ledge will become cold if the insulation settles below it. Next week we'll put some more sensors in throughout the thickness of a section of wall to test the thermal performance.
Here, Wayne puts the final touches on the word's first HUG Super-Damper. It's a 120 square inch opening (that's like a 12 inch duct) with an R30, stepped cone plug with double seals. Oooh yeah! That baby is gonna be the star in my whole-house vent and then close off like no other damper I've ever seen. It'll be on a thermostat that will tell it to open on summer evenings as it cools, or on sunny winter days when I have an excess of solar heat.


Dense-Packing Cellulose:
For absolute novices, I think we did pretty well. Mike manned the blower, kept it fed, and helped track how much insulation were putting into each section of wall to ensure proper density. I mostly ran the blower while Sam and Shawn sheeted the walls. under the windows we blew into insul-web sheeted areas before sheeting.


Here is an example of a cavity filled up to the top of the sheeting so far.

We recommended Selson-Blue for this condition, but Sam thought the "gray look" made him look more like me which he liked.

Wednesday, August 25, 2010

People powered generator IV


We have been working on the next generation of prototypes for our generation system. We set up a bicycle-powered generator, and were able to get around 40 watts using a permanent magnet motor. We installed a custom high output generator on the portable pedals and are able to achieve 100 watts with moderate effort. We are going to find a voltage controller for this and set it up for use in the ARC '08

Sunday, August 22, 2010

Retrofit - Week 6


Another good week, even though Peter, of Lofstrom Construction took his long planned vacation. Last week Sam was gone for 3 days and next week, Shawn is off on his honeymoon. That means we have an accidental, but concise test for individual contribution to team dynamics. The team is working well, though, so I have no concerns, it'll just be interesting.

This week saw the boys get all the walls blacked in with ice & water shield and the east wall framed out for insulation.


Here Sam does some detailing on the foam insulation that we are putting there just in case of
settling. We realized we might have to do that under the windows, too.

Here you can see the insulweb mesh that we're using to divide the cavities for the dense packing. Using cellulose in this way is one of the most experimental part of this project. I found myself looking at all the framing and wondering if it was worth it, or if I should've just applied 10 inches of foam board. Five layers of 2" foam board woulda been about $3.50/ft^2 and still woulda needed some good way to support it and have stripping on the outside for the siding. The cellulose is about $1/ft^2 and needs a bit more framework. I think it will work out fine.

Jake and I finished the window well and backfilled it. After putting the rocks in it, we realized that it would be easier to clean out debris that will be falling in during the next phases before we put the rocks in.
Here is a pre-backfill picture showing the dead-men reinforcements.


Chris from Complete Chimney Care got the Chimney got the new stainless steel chimney installed up through the roof. Should be a nice, tight chimney. We still have to cap the whole chimney structure after we get the ducts through the other two flues. And we have to build the structure on the top of the roof before the roofer shows up with the steel.


And we started talking to Nagel-Built cabinets here in Pine River about what He could do for us. He'll have a plan next week to look at.

I also applied for the wiring permit this week. Then just today, as I was beginning the wiring in the bathroom, I decided to pull all the insulation out of that attic space that is now inside the air barrier and an R90+ roof. That little attic can be a Secret Attic Hideaway for the kids.

Wednesday, August 18, 2010

Retrofit Planning: Pre-Audit

An important part of planning this deep energy retrofit is understanding the performance of the building before we start. There is a chance that Obama's federal incentives or Cash-for-caulkers may, yet come through, and that looks like it will require a test before and after, too. To address both these, we had Peter Lofstrom of Evergreen Energy Audits do an energy audit for us one chilly March morning.

Here is a little background on the house. We have 3 bedrooms, two baths, and a total of 3608 sq. ft. of conditioned space. It was built in 1978, or so, with 2x6 walls insulated with fiberglass bats. The roof is mostly 2X6 rafters with fiberglass bats, too. The basement is 12" block with no insulation in the outside. Approximately half of the inside of the basement has a finished interior with some foam insulation under it. The windows are nice Anderson casements single panes with a clipped on storm pane. Two large windows in the living room face south and two smaller ones face south in the master bedroom, upstairs. These really help catch some Btus on sunny, winter days.


Energy Audit Results:

Peter did 3 main tasks as part of our energy audit. First, he did a blower door test to measure how leaky the shell of the building was. Then as the blower was sucking cold air into the building through every little gap in the walls, we walked around with a thermal camera to see exactly where the major leaks were. Finally, he compiled our energy bills for the last 12 months into various energy indexes.

Blower Door Test:
We have a relatively drafty 5.92 ACH@50Pa, or about 3087 cfm, which is about average. This is estimated to translate to 300 cfm of natural ventilation in the winter, which provides plenty of ventilation. When we tighten the house up, we'll have to add mechanical ventilation through a heat exchanger. By comparison, the ARC on campus had a 0.46 ACH50, over 92% better.

Thermal Camera Images:

Above is the worst spot we found for leakage. The middle wall of the bathroom was not sealed at the top, so the cold air was rushing in during the leak test. This explains why the roof over that area slowly, but consistently melted the snow on it.
At the peak of the atrium area around the chimney was another problem spot. The roof up there is only 2X6 rafters with a large masonry chimney protruding through it. It's amazing to me that my heating bills weren't much higher, even with the heat pump.
And this is a typical window shot showing the cold air leaking through around the frame, behind the trim.

Heating energy:

The home was originally heated with a centrally located fireplace and electric baseboards on a dual-fuel rate. About 5 years ago I installed an open-loop ground water heat pump and the associated duct work. Because of the efficiency of the heat pump, we were only paying $160 for heat in January, and only $850 per year for heat.

In this graph, you can see the red lines for heating energy, peaking at 2500 KWH per month while the other uses hold near 1500 KWH. During this time, we had about 9122 heating degree days.

Energy Index - (Heating BTU/SF/HDD) your score is 1.38
We did very well on this. Typical might be 4 to 8 for comparable age style of houses. (Passiv Haus standard is .28) We probably scored well because of our heat pump. Without the heat pump we would probably be in the 5 to 6 area.

Energy Intensity Rating – (Total Energy BTU/SF/Yr) your score is 29,252
Again, we were on the low-ish end of the scale, but not at the bottom. Passiv Haus standard is 38,100 Btu/SF/yr of Primary energy (energy of the coal going into the power plant in my case), which works out to about 14,000 BTU/SF/Yr.


So there you have it. We have a typical house from the 70s that is already much cheaper to heat because it has a heat pump. We're gonna try to get it closer to Passive House, because I'm a bit envious of the houses we're building on campus.


Saturday, August 14, 2010

Retrofit: Week 5

The fifth week of the project started out hot and ended up wet. Nice if you're on a date, not as much fun when doing construction. Still, we have a good list of accomplishments:
Saturday and Sunday: We mostly finished the south window
Monday: Insulated, Sheeted, and blacked in the north half of roof. This is a picture of Monday Morning.

I got some pictures of insulation in the cavity and enough insulation all over me to look like I was molting.


Tuesday: The guys mostly installed window boxes. This made room in the garage. The windows arrived and were stored in the newly empty garage.

Wednesday: Setting more window boxes and then starting the ice and water shield (gummy bear) on the East wall. We decided it was easier to "flash" the window boxes first and then fill in the flat parts of the wall later. Pete had stepped on a nail and had a bit of a limp and sore foot, so we wrapped up a bit early.
Thursday: Did some application of ice and water shield around window boxes before the rain, the gable vent (man way) on the south side got installed, and more than half the plywood on the ceiling in the addition got placed.
Friday: More details about how to do the wall extensions for the cellulose insulation. We were considering how to make it come out looking straight and plumb despite the not so straight actual house walls under it.

Retrofit - Window Wells

When I started out, I thought I wanted landscaping block retaining walls for window wells. After figuring out what that would really cost, I decided on 5X6 timbers, instead, much like what was there before. The design is for stepping up two timbers and then stepping back two, which leaves a ledge that is half dirt. Hopefully I can get some creeping charlie to colonize the whole thing and turn it green.
Here is a picture of the deeper, south window well in process. I'll add some more photos later of the finished look and the other two that are more complete.

Saturday, August 7, 2010

Retrofit - Week 4

Week Four saw the addition trusses sheeted and coated with a leaky roof underlayment. Sam was first on the scene for several leaky roof moments and taught me some cool new swear words. Then we started clearing the existing roof shingles and overhangs, wrapping it with ice and water shield, and then setting trusses on it. They also got most of the window boxes set in place.


The house looked so strange without any overhangs at all. Luckily, the south side had 42 inch overhangs and lookouts. After adding 12 inches on the walls, it will only be a 30 inch overhang. If I had it to do over, I would've made 42" overhangs after the walls were furred out. Overhangs are awesome.

South side with lookouts and sheeting.

Sam working on removing the overhang so we can wrap the air barrier over the existing decking.

House without any overhangs. This picture doesn't really show how weird it is.

Setting trusses. Driving the lift is tricky for this because of all the trees in the yard.
Built out with lookouts and overhangs. Ready for some sheeting and insulation on Monday (which has to happen in one day so we can get it covered over and keep it dry.)


Wednesday, August 4, 2010

Summertime labor help.

Doug and Wayne are mixing cement and pouring a stable foundation for the new gate.